Ladder Type FRP Cable Trays: Complete Installation Guide 2026
📋 Table of Contents
- 1. Introduction to Ladder Type FRP Cable Trays
- 2. Why Choose FRP Over Traditional Materials
- 3. Pre-Installation Planning
- 4. Tools & Materials Required
- 5. Step-by-Step Installation Procedure
- 6. Load Calculations & Capacity
- 7. Spacing & Support Guidelines
- 8. Horizontal vs Vertical Installation
- 9. Safety Best Practices
- 10. Common Installation Mistakes to Avoid
- 11. Post-Installation Maintenance
- 12. Frequently Asked Questions
1. Introduction to Ladder Type FRP Cable Trays
Ladder Type FRP (Fiber Reinforced Plastic) Cable Trays are the industry's preferred choice for managing heavy-duty electrical cable installations across industrial facilities, chemical plants, power stations, and outdoor infrastructure projects. Their open-ladder design provides superior ventilation, easy cable access, and exceptional load-bearing capacity, making them ideal for both horizontal and vertical cable management applications.
At Sai Seeya Composite Pvt. Ltd., we manufacture premium-grade Ladder Type FRP Cable Trays that comply with international standards and have been installed in major projects across India, Indonesia, Saudi Arabia, UAE, Nigeria, and many other countries.
This guide is based on over a decade of installation experience across diverse industries, and provides actionable insights for engineers, contractors, and facility managers planning cable tray installations.
Key Features of Ladder Type FRP Cable Trays
- High Strength-to-Weight Ratio: Supports heavy cable loads while remaining lightweight
- Corrosion Resistant: Withstands chemicals, moisture, and salt air
- UV Stabilized: Suitable for direct outdoor exposure
- Fire Retardant: Self-extinguishing properties meet international fire safety standards
- Non-Conductive: Eliminates electrical hazards and EMI interference
- Maintenance-Free: Lifespan of 25+ years with minimal upkeep
2. Why Choose FRP Over Traditional Materials
Before diving into installation, understanding why FRP outperforms traditional materials helps justify the proper installation effort. For a detailed comparison, explore our material comparison guide.
| Feature | FRP Cable Trays | GI Cable Trays | Aluminum Trays |
|---|---|---|---|
| Weight (per meter) | 2-4 kg | 8-12 kg | 5-7 kg |
| Corrosion Resistance | Excellent | Moderate | Good |
| Lifespan | 25+ years | 10-15 years | 15-20 years |
| Electrical Conductivity | Non-conductive | Conductive | Conductive |
| Installation Time | Fast (light weight) | Slow (heavy) | Moderate |
| Maintenance Cost | Very Low | High | Moderate |
| Total Cost (10 yrs) | Lowest | Highest | Moderate |
3. Pre-Installation Planning
Successful installation begins with thorough planning. Skipping this phase leads to costly rework, missed deadlines, and safety issues. Here's what to consider:
Site Assessment
- Route Planning: Identify optimal cable routes from source to destination, avoiding obstructions, hot zones, and high-traffic areas
- Environmental Conditions: Document temperature ranges, humidity, chemical exposure, and UV intensity
- Structural Anchoring Points: Confirm walls, ceilings, or framework can support the tray system weight plus cables
- Clearance Requirements: Maintain minimum 100mm clearance from heat sources, 300mm from high-voltage cables
Design Documentation
Prepare these documents before starting:
- Cable schedule with sizes, types, and quantities
- Single-line diagram of cable routes
- Tray sizing calculations
- Support spacing diagrams
- Bill of Materials (BOM)
💡 Pro Tip from Sharda Cable Trays
Always order 10-15% extra material to account for cuts, modifications, and unexpected changes during installation. This avoids costly delays and ensures color/batch consistency.
4. Tools & Materials Required
Essential Tools
- Measuring Equipment: 5-meter tape measure, laser distance meter, spirit level (600mm), plumb bob
- Marking Tools: Chalk line, marker pen, string line
- Cutting Tools: FRP cable tray cutter (recommended) or hacksaw with metal blade, file for smoothing edges
- Drilling Equipment: Drill machine, masonry bits (10-16mm), wood/metal bits as needed
- Fastening Tools: Spanner set (10-24mm), torque wrench, allen keys
- Safety Equipment: Safety helmet, gloves (rubber-coated), safety glasses, dust mask, harness for height work
- Access Equipment: Step ladder, scaffolding, mobile elevated work platforms (MEWP)
Materials Required
You'll need the following materials, all available from our complete accessory range:
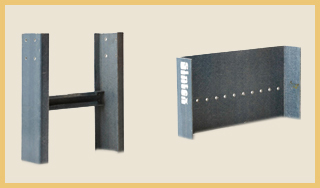
- Ladder Type FRP Cable Trays (in required lengths)
- Coupler Plates (for joining tray sections)
- Horizontal Bends (inner & outer, 90° and 45°)
- Vertical Bends (inner & outer)
- Reducers (for size transitions)
- Tee Bends, Cross Bends (for branching)
- GI Threaded Rods (10mm/12mm)
- GI Hex Nuts, Washers, Spring Washers
- Anchor Fasteners (M10/M12)
- C-Channel or Z-Channel Support Brackets
- Cable Tray Covers (optional)
5. Step-by-Step Installation Procedure
Mark the Installation Route
Using chalk line and laser level, mark the exact route on walls or ceiling. Ensure the line is perfectly horizontal (or follows your planned grade). Mark support locations at calculated spacing intervals (typically 1.5-2.5 meters).
Install Support Brackets
Drill holes at marked locations using masonry bits. Insert anchor fasteners and tighten. Attach C-channel or Z-channel support brackets using threaded rods and nuts. Ensure all supports are at the same level using a spirit level. Apply torque per manufacturer specs (typically 25-30 Nm).
Position the First Tray Section
Lift the FRP ladder tray section onto the supports. Position it so the rungs face down (cables sit on rungs). Center the tray on the supports and verify alignment using the laser line. Temporarily clamp in place.
Join Tray Sections Using Couplers
Connect the next tray section using coupler plates on both sides. Insert bolts through the pre-punched holes. Hand-tighten initially, then torque to specification. Maintain a gap of 6-12mm between tray sections for thermal expansion.
Install Bends and Fittings
At route direction changes, install appropriate bends (horizontal/vertical, inner/outer). Use the same coupler plate connection method. Ensure bend radius accommodates your largest cable (minimum 8x cable diameter).
Secure Trays to Supports
Once all sections are connected and aligned, secure trays to support brackets using bolts and washers. Tighten to specified torque. Verify the entire system is level and properly supported.
Cable Laying and Final Inspection
Lay cables in the tray, maintaining proper spacing per the cable schedule. Use cable ties or clips every 2-3 meters. Conduct final inspection for: proper alignment, tightness of all bolts, support integrity, and clearances from other systems.
6. Load Calculations & Capacity
Accurate load calculation is critical for safety and longevity. Here's the formula and process:
Load Calculation Formula
Total Load (kg/m) = Σ (Cable Weight per meter)
Then verify: Total Load × Distance Between Supports ≤ Tray Rated Capacity × Safety Factor (1.5)
Typical Load Capacities
| Tray Width | Rung Spacing | Load Capacity (kg/m) | Max Support Span |
|---|---|---|---|
| 100mm | 250mm | 50 kg/m | 2.0 m |
| 150mm | 250mm | 75 kg/m | 2.0 m |
| 300mm | 300mm | 100 kg/m | 2.5 m |
| 450mm | 300mm | 120 kg/m | 2.5 m |
| 600mm | 300mm | 150 kg/m | 2.5 m |
| 900mm | 300mm | 200 kg/m | 3.0 m |
7. Spacing & Support Guidelines
Support Spacing Best Practices
- Light Loads (up to 50 kg/m): Support every 2.5 meters
- Medium Loads (50-100 kg/m): Support every 2.0 meters
- Heavy Loads (100-150 kg/m): Support every 1.5 meters
- Very Heavy Loads (150+ kg/m): Support every 1.2 meters
Cable Spacing Within Tray
Maintain proper spacing between cables to prevent overheating:
- Power cables: 1 cable diameter apart minimum
- Control cables: Touching is acceptable
- Mixed cables: Group by type, maintain separation between groups
- Maximum tray fill: 40% for ladder type (allows ventilation)
8. Horizontal vs Vertical Installation
Horizontal Installation
- Standard support spacing applies
- Cables rest naturally on rungs
- Use cable ties every 2-3 meters for organization
- Consider cable tray covers in dusty environments
Vertical Installation
- Support spacing can be slightly larger (up to 3 meters for heavy duty trays)
- MUST use cable retention clips every 1.5 meters
- Cables must be tied to prevent slippage downward
- Use vertical inner/outer bends at top and bottom
- Install protective covers at floor level to prevent damage
For comprehensive information on bend types, explore our bend types guide.
9. Safety Best Practices
⚠️ Safety First - Non-Negotiable Rules
- Always de-energize circuits before installation
- Use proper PPE (Personal Protective Equipment) at all times
- Maintain 3-point contact when working on ladders
- Use fall protection harness above 1.8 meters
- Never overload trays beyond rated capacity
- Maintain proper electrical clearances
- Test all fasteners after installation
FRP-Specific Safety Considerations
- Cutting: Use dust mask when cutting FRP (fiber dust can irritate)
- Drilling: Drill slowly to prevent cracking
- Handling: Wear gloves to prevent fiber splinters
- Disposal: Collect cuttings for proper disposal
10. Common Installation Mistakes to Avoid
Learn from others' errors. Here are the most common mistakes we've observed across 1,000+ installations:
❌ Top 10 Installation Mistakes
- Insufficient Support Spacing: Leading to sagging and structural failure
- Improper Coupling: Loose joints causing alignment issues
- Ignoring Thermal Expansion: No expansion gaps between sections
- Wrong Bend Radius: Damaging cable insulation
- Mixing Materials: Using GI fasteners in corrosive environments
- Overfilling Trays: Exceeding 40% fill, causing overheating
- Inadequate Clearances: Not maintaining distance from heat sources
- Poor Cable Management: No ties, leading to cable migration
- Missing Grounding: Not grounding adjacent metal components
- Skipping Documentation: No as-built drawings for future reference
For more detailed insights on installation errors, check our comprehensive guide.
11. Post-Installation Maintenance
While FRP cable trays require minimal maintenance, regular inspections ensure long-term performance:
Quarterly Inspection Checklist
- ✓ Check for loose fasteners or tightness
- ✓ Inspect cable insulation for damage
- ✓ Verify support brackets are secure
- ✓ Look for any signs of physical damage
- ✓ Clean dust accumulation
- ✓ Check cable ties and retention clips
Annual Detailed Inspection
- ✓ Thermal imaging for hot spots
- ✓ Verify load distribution
- ✓ Check expansion joints
- ✓ Test grounding continuity
- ✓ Document any changes or additions
Need Premium Ladder Type FRP Cable Trays for Your Project?
Sai Seeya Composite Pvt. Ltd. is an ISO 9001:2015 certified manufacturer of Ladder Type FRP Cable Trays, supplying to projects across India, Indonesia, Saudi Arabia, UAE, Nigeria, and 50+ countries worldwide. Get expert consultation and competitive pricing.
📞 Request Quote View Products12. Frequently Asked Questions (FAQ)
Q1: What is the recommended spacing between supports for Ladder Type FRP Cable Trays?
The recommended spacing between supports for Ladder Type FRP Cable Trays is typically 1.5 to 2.5 meters, depending on the cable load and tray width. For heavy loads, reduce spacing to 1.2-1.5 meters. Always refer to manufacturer specifications and load tables for your specific tray model.
Q2: What tools are required for Ladder Type FRP Cable Tray installation?
Essential tools include: measuring tape, level, drill machine with masonry bits, GI threaded rods and fasteners, spanner set, safety equipment (gloves, helmet, safety glasses), cable tray cutter, marking chalk, and a sturdy ladder or scaffolding for elevated installations.
Q3: How do I calculate the load capacity of Ladder Type FRP Cable Trays?
Calculate total cable weight per meter, multiply by tray length between supports, and ensure it's within tray's rated capacity. Standard FRP ladder trays support 50-150 kg/m depending on width and rung spacing. Always include a safety factor of 1.5x for dynamic loads.
Q4: Can Ladder Type FRP Cable Trays be installed outdoors?
Yes, Ladder Type FRP Cable Trays are excellent for outdoor installations due to their UV-stabilized resin, corrosion resistance, and weather-proof properties. They withstand temperatures from -40°C to +80°C and require minimal maintenance even in harsh environments like coastal areas, deserts, and high-humidity zones.
Q5: What is the difference between vertical and horizontal installation of FRP cable trays?
Horizontal installation requires supports every 1.5-2.5m and considers cable weight distribution. Vertical installation needs supports every 1.8-3.0m and must account for cable pull-down forces. Vertical runs also require cable retention clips every 1.5 meters to prevent slippage.
Q6: Why choose FRP over GI for ladder type cable trays?
FRP ladder cable trays offer superior corrosion resistance, are 70% lighter than GI, non-conductive (electrical safety), fire retardant, UV stable, and have a 25+ year lifespan with minimal maintenance. They're ideal for chemical plants, coastal areas, and outdoor installations where GI would corrode.
Q7: How much do Ladder Type FRP Cable Trays cost?
Pricing varies based on tray width, length, load capacity, and quantity. Generally, FRP cable trays range from ₹500-₹5,000 per meter. Contact Sharda Cable Trays for detailed quotation based on your specific requirements. Bulk orders and export pricing available.
Q8: Do you provide installation services for FRP cable trays?
While Sai Seeya Composite Pvt. Ltd. primarily manufactures and supplies, we provide comprehensive installation guidance, technical drawings, and on-site consultation through our network of approved installation partners across India and major export markets including Indonesia, Saudi Arabia, UAE, and Nigeria.
Get Expert Consultation for Your Next Project
From Pune to Pakistan, Indonesia to Iraq - we deliver world-class FRP Cable Trays globally. ISO 9001:2015 certified, MSETCL & Maha-Metro approved manufacturer.
Send Enquiry 📞 Call: +91 77750 95888